ICQ
Tour

A
Guided Tour to ICQ
ICQ ("I Seek You") is a user-friendly Internet program that notifies
you which of your friends and associates are online and enables you to contact
them. With ICQ, you can chat, send messages and files, exchange Web page
addresses, play games, create your own homepage, and much more. With the click
of your mouse, you and your friends are instantly connected.
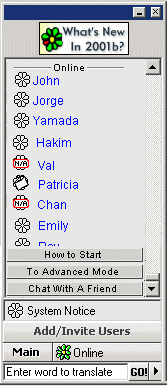
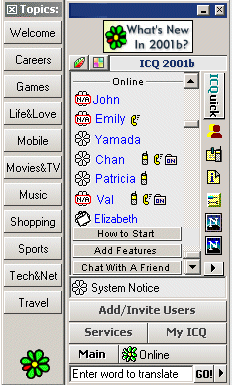
The Contact List
The Contact List is the list of ICQ users that you want to be in contact
with.The list first includes the contacts that are online, and then those that
are offline.
You can identify the status of each contact by the icon next to the contact's
nickname.
Adding Users
Once ICQ is up and running you can add friends, associates and other ICQ users
to your Contact List.
- Click on the Add Users button to launch the Add/Find Users
dialog.
You can search for ICQ users by:
 | Email - Search for an ICQ user by an Email address.
 | Nickname, First or Last name - Search for users according to
these parameters.
 | ICQ number - If you know the user's ICQ#, use this field to
conduct the search. |
| |

Once you have added users to your Contact List, you may send them messages.
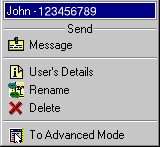
Right click on a user's name on your ICQ Contact List.
The User's Menu pops up.
You have the following options:
 |
 |
Message
- Send an outgoing message.
|
|
 |
User's
Details - View a user's information and details.
|
 |
Rename
- Change the user's name on your Contact List.
|
 |
Delete
- Delete a user from your Contact List.
|
 |
Advanced
Mode - Switch to Advanced Mode. |
Sending Messages
- Click on a user you wish to contact.
- Select Message on the User Menu.
- Type in your message.
- Choose the mode or modes (ICQ, SMS, E-mail) that you want to send your
message in, by checking the box at the bottom of the box.
- Click Send.
Note: Some previous versions of ICQ (ex. ICQ Version 98a) are limited
to receiving messages of up to 450 characters. Offline users (with any
version) can only receive messages of up to 450 characters.
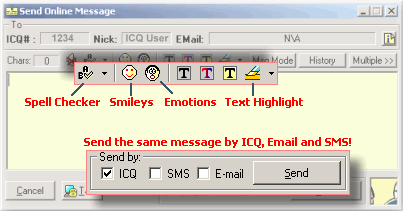
The text you typed will automatically move to the upper box:
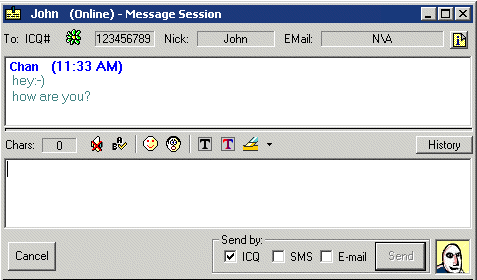
While you type your message you will hear a typing machine sounds. If you wish
to disable this option, click on the  icon next to the character count.
You have the option to set the font, font color and background color of your
messages.
Viewing a User's Details
- Click on the name of the user in your Contact List.
- Select User's Details.
- Click Retrieve at the bottom of the User Details window to
view the most recent information the user has provided on the ICQ Global
Directory.
- View the different tabs to learn more about the user.
You may add your own information and comments about the user in the the About
Tab.
Renaming a User
- Click on the name of the user you wish to rename.
- Select Rename.
The user's name is highlighted.
- Type in the name you wish to appear on your Contact list for this user.
- Press Enter - The name you chose appears on your Contact List.
Deleting a User
- Click on the name of the user you wish to delete from your Contact List.
- Select Delete - A confirmation window appears.
- Click Yes to delete a user or No to cancel the deletion.
Advanced Mode
- Click on any name on your Contact List.
- Select To Advanced Mode.
The following window appears:
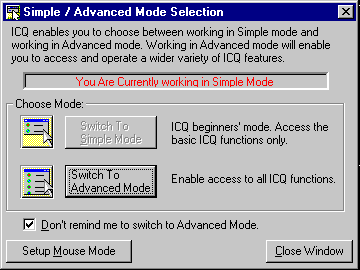
Figure 4: Simple/Advanced Mode
- Choose Switch to Advanced Mode.
- You will now be able to enjoy all of the ICQ functions.
ICQ Global Directory
Search Engine
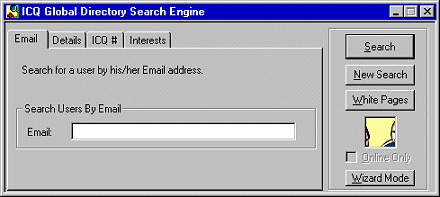
Search for your friends and contacts on the ICQ Network.
If you found your friends or contacted them on the ICQ network, you can now add
them to your Contact List. If they're not members of ICQ yet, invite them to
join and add them to your future users watch. The ICQ service will inform you
when they join the ICQ Network.
 | Search by email - Fill in this field to search for users by their
email.
 | Search by Nick name / First name / Last name - Search by any of
these parameters.
 | Search By ICQ# - Simply enter the ICQ# of the user you want to find
or communicate with.
 | Search By Interest - Enter the interest criteria for which you want
to find users. |
| | |
Check Online Only to limit the search for those users that are currently
online.
View / Change My Details
Here's where you can change, update or remove any information provided for your
ICQ#.
- Click the ICQ button.
- Select the View / Change My Details. A dialog with 8 tabs will be
displayed.
- Enter/Change your details.
- Click Save. The information you post on these tabs will mostly be
shown to other ICQ users when they search for information you specify.
Please note: Providing any information about yourself on ICQ is
voluntary.
The more information you provide about yourself the easier it will be for
your friends to locate and communicate with you. Information you do provide
will be published on the ICQ directories and will be visible to, and may be
obtained by ICQ & Internet users.

The Owner Preferences feature enables you to customize your Preferences in
the ICQ program. You do not need to configure these preferences in order for
most features to work. However, as you get to know ICQ, you might find that
customizing ICQ features will enhance your enjoyment of the program.
- Click the Main button
- Select Preferences.
- Click on one of the Preferences topics on the left column of the
Preferences dialog and select your preferences for that topic on the right
pane.
The following Preferences topics may be configured:
 | Contact List - lets you customize
the appearance and settings of your Contact List.
 | Connections - lets you specify the
ICQ server to which you are connected.
 | Events - lets you specify parameters for
incoming messages.
 | Message Spell Checker - enables you to check the spelling in
the messages you send.
 | Edit Launch List - automatically
launches the applications you set to start when connection to the
Internet is detected.
 | ICQ Email Import - lets you add
friends to your contact list by searching for e-mail addresses in your
e-mail program(s) address book that is installed on your computer. |
| | | | |
Contact List Preferences
This window lets you customize the appearance and settings of your Contact List.
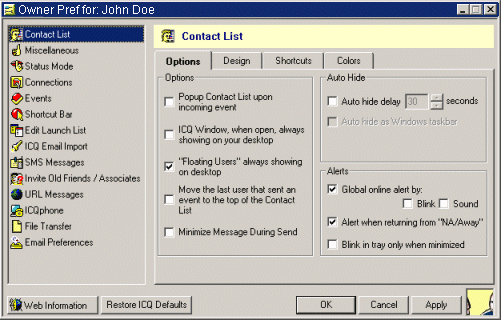
The Options Pane
 | Check the Popup Contact List upon incoming event to set your
Contact List to automatically open (if it was minimized) upon receipt of an
incoming event.
 | Check the Global online alert by: to receive an alert when a user
comes online. Then check the Blink to receive a flashing user name
alert and/or the Sound to receive a sound alert. |
|
The Design Pane
 | Check the Show Contact List buttons to show the buttons that appear
at the bottom of your Contact List.
 | Check the Show user ToolTip to enable the User ToolTips feature on
your Contact List.
 | Check the Sort Contact List by: to view the names on your Contact
List either alphabetically by name or according to their availability
status. |
| |
Miscellaneous Preferences
 | Check the Show ICQ Welcome to enable ICQ announcements to be
displayed upon start-up of the program.
 | Check the Access menus by left button to be able to access the user
menus for each user on your Contact List by using the left mouse button.
(This is the default.) |
|
Connections Preferences
Define your internet connection type, firewall settings and more, using the
various tabs of the Connection Preferences dialog.
 | The General tab allows you to specify
your Internet connection type.
 | The Servers tab enables you to change the configurations of your
ICQ server host and port.
 | The Firewall
tab allows you to change your Proxy server settings if you are behind a
Firewall. You may define more than one Proxy.
 | The User tab enables you change the incoming ports for
communication with users that are behind a Firewall.
|
| | |
General Tab
To specify your Internet connection type:
 | Select the Modem (dial-up connection) or the Permanent (LAN,
Cable Modem, etc.) to choose between the two sorts of connections.
 | Check the Launch ICQ on startup to launch the NetDetect Agent when
you start your computer, which will automatically launch ICQ when you
connect to the Internet.
 | Check the Launch default Web browser when connection is detected to
automatically launch your Web browser upon connection to ICQ or to the
Internet.
 | Check the Automatically activate sleep mode upon disconnection to
put the NetDetect Agent in your desktop so that ICQ is launched upon
connection to the Internet. (If you've disconnected from the Internet and
closed ICQ, once you re-connect to the Internet again, this option will
launch your ICQ.) |
| | |
Click on the Edit Launch List button to launch other applications upon
connection to the Internet.
Events Preferences
This enables you to specify parameters regarding sending or receiving messages,
such as playing a sound upon receipt of an event, or logging your event history.
Edit Launch List
Set the applications you wish to automatically launch when you connect to the
Internet.
- Click the Add button to select an application
- Click the Save button to save your changes, or click the Cancel
button to exit the dialog without saving your changes.
ICQ Email Import
Preferences
This option enables ICQ to search for friends in the address book (or books) of
the e-mail program that is installed on your computer, compare it with the ICQ
database and add them to your contact list.
(Note: This feature works only with Outlook, Outlook Express, Eudora and
Netscape Navigator).
You can set ICQ to search for contacts since your previous search to avoid going
through a long list of contacts that have already been listed.
Status Options
 When using the Simple Mode, you can choose to be in Online, Offline or
Away status modes. That is, either connect to the ICQ servers, disconnect from
them or project to others that you are away from your computer.
The System Notice
Right clicking on the System Menu will open the following options:
 | History and OutBox - History of events you sent and received.
 | Incoming Files Folder - Check what your incoming files folder
consists of.
 | Incoming Bookmarks - The Incoming URLs that you have saved as
bookmarks are stored in your Incoming Bookmarks. This option opens up your
browser and allows you to view all of your incoming URLs.
 | To Advanced Mode - Switch to advanced features mode. |
| | |
The Web Search
 The ICQ Web Search makes searching the Web quick and easy. The Web Search is
located at the bottom of the ICQ Window providing a gateway to the Web. Just
enter a search query and press Enter and you are led to the search
results on ICQs own search engine. Even when your ICQ Window is minimized you
may use the ICQ Web Search floating panel to search the Web from your desktop,
as you work on other applications.
The Contact List
The Contact List is a list of friends you can communicate with - exchange
messages, URLs, files, chat, etc. Before you begin using all these fun options
and more, add friends to your Contact List.
New! Access Your
Contact List from Anywhere
From the release of ICQ 2001b, the Contact List is saved on the ICQ servers. If
you already have ICQ on your computer, your Contact List will be uploaded to the
server automatically when you download ICQ 2001b.
 From now on you can access your contact List from any computer or wireless
device, Anywhere in the world.
Manage your Contact List
 Use these two buttons above the Contact List to manage your list according to
your needs:
 The Status button determines if all your contacts (both online and
offline) are displayed or only the ones that are online.
 The Groups button lets you to divide your Contact List into groups to
more easily manage your list.
The Topics bar on the left side of your ICQ Window is the best ICQ way to
get your music, movies, sports, games, tech and world news, while meeting ICQ
friends who share your interests.
Add/Invite Users
Once ICQ is up and running you can add friends and other ICQ users to your
Contact List.
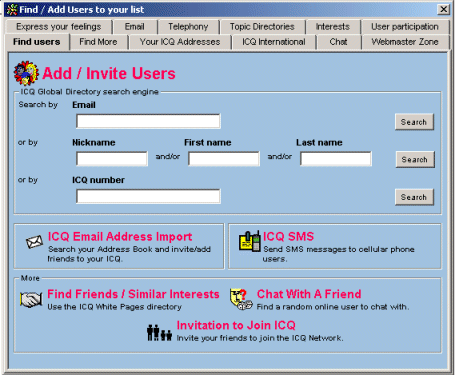
- Click on the Add/Invite Users button to launch the Add/Find
Users dialog.
You can search for ICQ users by:
 | Email - Search for an ICQ user by an Email address.
 | Nickname, First or Last name - Search for users according to
these parameters.
 | ICQ number - If you know the user's ICQ#, use this field to
conduct the search. |
| |
If you've tried adding the user to your Contact List and need permission to do
so, you may find the new Request for Authorization Follow Up Service
handy. You now have the possibility to follow up on authorization requests that
you sent to other users whom you want to add to your Contact List. You can set
ICQ to re-send authorization requests and to send such users an email,
requesting their authorization.
To check the authorization status of a user:
- Click on the user name you are awaiting authorization from.
- Choose Authorization Status.
- Check the Re-Activate box or the Stop Service/Send Email box
to send a request via email to the user.
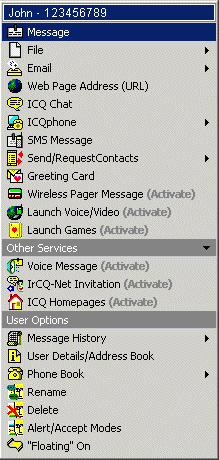
Once you add your friends to your Contact List, right-click on the contact's
name to reveal the following exciting options:
Options with (Activate) written next to them, will be downloaded when
clicked.
 |
|
 |
Message - Send your friends instant
messages. More
Info
|
 |
File - Send a file to
another user via ICQ. A file can only be transferred when both you and
the recipient are online. With Shared Files you can get files
from your friend's shared directory.
|
 |
Send Email - Send
Email using the optional ICQ Email. Once you have configured the ICQ
Enhanced Email Check (account settings), you can check your account
directly from your ICQ Window.
|
 |
Web Page Address (URL)
- Share your favorite Web sites with other ICQ users. Web Page Addresses
(URLs), like messages, can be sent to online or offline users.
|
 |
ICQ Chat - Chat with
your friends while you are online.
(You can make a Chat Request while you are offline.) More
Info
|
 |
ICQ Phone - ICQphone
is a low cost, high quality product for direct voice communications.
ICQPhone makes it possible for users to initiate and participate in free
PC-to-PC calls and PC-to-Phone and Phone-to-Phone calling cards calls.
|
 |
SMS Message - SMS,
Short Messages Service, is a technology used in cellular phones to send
text messages to and from cellular phones. This integrates ICQ with SMS
technology and is currently available with selected cellular phone
providers. |
 |
Send/Request Contacts
- Send parts or all of your Contact List to other users so that they can
add your contacts to their own Contact Lists. With Request Contacts you
can have your friends send you all or part of their Contact List.
|
 |
Greeting Card - The
ICQ Greeting Card feature enables you to make and send creative
greetings for every occasion.
|
 |
Wireless Pager Message
- Send messages from your ICQ to wireless pager owners.
|
 |
Launch Voice/Video -
Send your contact an invitation to use various software applications
that you and the user share.
|
 |
Launch Games - Send
your contact an invitation to use games that you and the user share.
|
Other
Services
|
 |
Voice Message - This
feature allows you to send or receive voice messages and WAV files.
|
 |
IrCQ-Net Invitation
lets you invite friends to IrCQ-Net (ICQ IRC Service) Chat rooms.
|
 |
ICQ Homepages Invite
your friend to visit your homepage and forward your friend news about
your homepage.
|
User
Options
|
 |
History - This
feature lets you to view the history of incoming and outgoing events
(Messages, URLs, Files) quickly and easily.
|
 |
User Details/Address Book
- View or change your details provided on ICQ Global Directory.
|
 |
Phone Book - This
feature allows you to send another user a phone call request and lets
your program dial the number too. You can also get the phone number
where the user is currently located and coordinate a convenient time for
the phone call to take place.
|
 |
Rename - Change how a
user's name appears on your Contact List.
|
 |
Delete - Remove a
user from your Contact List.
|
 |
Alert/Accept Modes -
This feature enables you to customize your communications with each user
on your Contact List.
|
 |
"Floating" On
- You can use the Floating option with specific users on your Contact
List, so that their names appear to be floating wherever you place them
on your desktop. |
ICQ Global Directory
Search Engine
Search for your friends and contacts on the ICQ Network. If you found your
friends or contacted them on the ICQ network, you can now add them to your
Contact List. If they're not members of ICQ yet, invite them to join and add
them to your future users watch. The ICQ service will inform you when they join
the ICQ Network.
- Click the Main button.
- Select Add / Invite Users.
- Choose Find User -> Add to List.
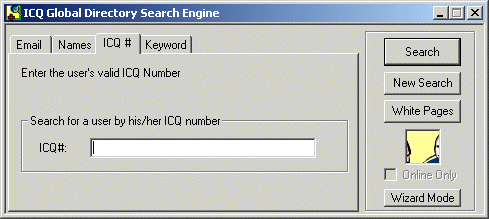
The ICQ Global Directory Search Engine is displayed with the following
search options:
 | Search by email - Fill in this field to search for users by
their email.
 | Search by Nick name / First name / Last name - Search by any of
these parameters.
 | Search By ICQ# - Simply enter the ICQ# of the user you want to
find or communicate with.
 | Search By Interest - Enter the interest criteria for which you
want to find users. |
| | |
Check Online Only to limit the search for those users that are
currently online.
View / Change My Details
Here's where you can change, update or remove any information provided for your
ICQ#.
- Click the Main button.
- Select the View / Change My Details. A dialog with 8 tabs will be
displayed.
- Enter/Change your details.
- Click Save. The information you post on these tabs will mostly be
shown to other ICQ users when they search for information you specify.
Please note: Providing any information about yourself on ICQ is
voluntary.
The more information you provide about yourself the easier it will be for
your friends to locate and communicate with you. Information you do provide
will be published on the ICQ directories and will be visible to, and may be
obtained by ICQ & Internet users.
The Services menu contains most of the new ICQ features:
 | My Communication Center - Upon registration,
every ICQ user is provided with an ICQ Personal Communication Center
featuring his contact details, interests, personal IrCQ-Net chat room and
the various ways in which she/he may be contacted.
 | Answering Service - When you're away or do
not wish to be disturbed you can leave outgoing messages on your ICQ for
people who are looking to make contact with you.
 | Email - Send email via
ICQ, send email and notify the recipient automatically, send your
information, check for incoming email, create an ICQ email signature and
more.
 | ICQphone - ICQphone is ICQ's newest low cost,
high quality product for direct voice communications. ICQPhone now makes it
possible for users to initiate and participate in PC-to-PC calls,
PC-to-Phone and Phone-to-Phone calling cards calls.
 | Phone - "Follow Me" - Set your
availability by phone.
 | SMS Message SMS, Short Messages Service, is a
technology used in cellular phones to send text messages to and from
cellular phones. The ICQ SMS feature integrates ICQ with SMS technology.
Currently for a list of the carriers that work with ICQ, go to the SMS
website.
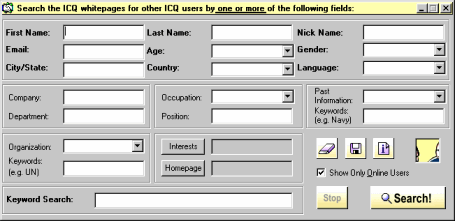
 | ICQ White Pages - ICQ Whitepages has been
redesigned and lets you find a specific person or group of people in the ICQ
directory listings in the traditional way using name, email etc or with just
a single keyword.
You can also save and load your favorite Whitepage search.
 | Search the Web - Search the Web through the "ICQ Search"
and various web engines.
 | ICQ Topic Directory Bar - Show or hide the ICQ Topic Directory bar.
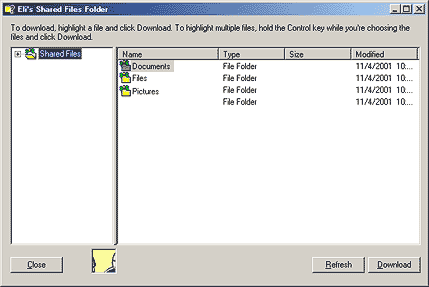
 | Shared Files - This feature lets you share a directory on your
computer with friends on your Contact list.
 | My ICQ WebFront - Create, maintain and host
your own communication center on your computer.
 | ICQ Free Info - Register now to receive free
information and offers by e-mail!
 | Newsletter - All you need to know about ICQ
services, products, events, tips & tricks, plus be the first to know all
about our community specials and events!
 | Translation - Use ICQ in your own language
with LingoWare. It is free!
 | ICQmail - Sign up for your FREE web based
email account.
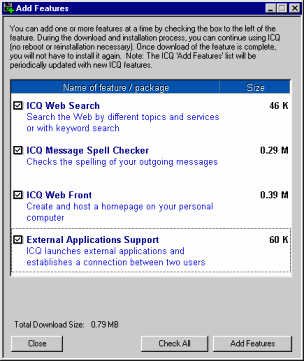
 | Add More Features - Pick and choose your favorite ICQ features for
your ICQ client - On the Services menu, you can choose which features
to add or remove.
 |
| | | | | | | | | | | | | | |
When you click on the My ICQ button, a menu is displayed providing you
with useful tools and options:
 | Change User on this Computer - Enables you to change the active
ICQ# on the computer, add another registered user, or remove an ICQ# from
the computer.
 | Registration to ICQ
- Enables you to register a new user or un register an existing user from
ICQ.
 | Add / Remove Features - Add or Remove your favorite ICQ features.
 | Save / Load Contact List - Lets you save a local back up version of
your Contact List. You can load your Contact List from here in case of a
problem.
 | View / Change My Details - Lets you update your ICQ# personal
details.
 | Send My ICQ Addresses - Lets your friends know how they can reach
you. More
info
 | Shortcut Bar (ICQ Quick) - A convenient and easy way to access ICQ
functions. ICQ comes with a default shortcut bar on the right side of your
ICQ Window. You can also add more shortcuts.
 | Message Archive - Search for messages, URLs, chats, etc, that were
used in your ICQ communication.
 | Events History - The ultimate storage for your files, bookmarks and
system messages.
|
| | | | | | | |
The Owner Preferences feature enables you to customize your Preferences in
the ICQ program. You do not need to configure these preferences in order for
most features to work. However, as you get to know ICQ, you will find that
customizing ICQ features enhances your ease and enjoyment of the program.
- Click the Main button.
- Select Preferences. The Preferences dialog is displayed.
- Click on one of the Preferences topics on the left column of the
Preferences dialog and select your preferences for that topic on the right
pane.

The following preferences topics may be configured:
 | Contact List - enables you to customize the appearance and settings
of your Contact List.
 | Miscellaneous - enables you to pre-determine general settings.
 | Status Mode - enables you to set general Availability-Status
configurations.
 | Connections - enables you to set your firewall settings and icq
server host.
 | Events - enables you to specify parameters for incoming file
transfers, ICQ chats, URLs, sound configurations and more.
 | Shortcut Bar - allows you to customize your shortcut bar enabling
you to access ICQ features and other applications from your ICQ window.
 | Edit Launch List - lets you customize the applications ICQ
automatically launches when a connection is detected.
 | ICQ Email Import - allows you to have ICQ search for an e-mail
address in the address book (or books) of the e-mail program that's
installed on your computer and compare it with the ICQ database (This
feature works only with Outlook, Outlook Express, Eudora and Netscape
Navigator).
 | SMS Messages - Configure your preferences for sending and receiving
SMS Messages.
 | Invite Old Friends / Associates allows you to get a notification of
users who have not logged on to ICQ for a set number of entries. You then
have the option to send them a reminder to log on to ICQ.
 | URL Messages - Configure your preferences for sending and receiving
URLs.
 | ICQphone - enables you to customize your ICQphone settings.
 | File Transfer - Configure your preferences for sending and
receiving files.
 | Email Preferences - enables you to configure ICQ to check your
Email client and notify you of new incoming mail. |
| | | | | | | | | | | | |
ICQ is proud to present ICQphone, which is our newest low cost, high quality
product for direct voice communications.
ICQphone now makes it possible for users to initiate and participate in PC-to-PC
calls, PC-to-Phone and Phone-to-Phone
calling cards calls. By using the Internet to carry the call over the widest
distance possible - we have brought rock-bottom prices, premier service and
communications freedom to ICQ users around the world.
Making a Free ICQ
PC-to-PC Call 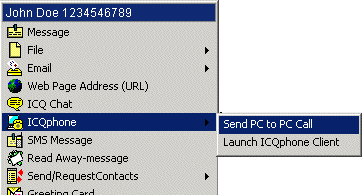
- Click the person on your ICQ Contact List you wish to call
- Select ICQphone
- Click Send to send an Online PC-to-PC call request.
Once the other side has accepted your request you may talk as much as you
like.
The ICQphone PC-to-PC calls do not cost you anything. Please note that sending a
PC-to-PC call request will enable the recipient to view the senders IP address.
ICQphone System Requirements
 | Windows 95, Windows 98, Windows 2000, Windows ME or Windows NT 4.0
 | Pentium PC 100 MHz or higher
 | 16 MB RAM
 | 28.8 kbps modem or higher
 | PPP Internet Connection
 | Sound Card
 | Microphone and Speakers or Headphones with microphone |
| | | | | |
Making a PC to Phone call
To make a phone call from your ICQ to a regular telephone or from a telephone to
another ICQ user, you need to have an ICQphone account. Simply, launch ICQphone
(Services button => ICQphone) and dial the phone number you wish to call,
including the area code and country code if neccessary.
ICQ Phone Charges
ICQphone is free. The software inside the ICQ client provides you with numerous
free services and enables you to communicate with your online friends over the
Internet at no cost.
Charges apply only to toll PC-to-Phone calls. These charges accrue on a per
minute basis, at rates substantially lower than telephonic communications, up to
95% less!
The PIN and the secret question
Upon registration of your ICQphone account, you select a PIN (Personal
Identification Number). It is used to confirm that you are placing a call or
using a given service. You will be prompted to enter your PIN each time you use
ICQphone. Your Secret Question is a question you designate at registration that
enables us to identify you in the event you forget your PIN or want other
information regarding your account. It is used much the same way banks and
credit card companies do to confirm the identify of a person calling about an
account.
If you forgot your PIN and can't use your ICQphone software, contact us at support@ICQphone.com
or through 1-888-376-2873 (from US). Your account number and a new PIN will be
sent to your e-mail address on file.
Privacy Options with ICQ
You can learn all about setting ICQ privacy and security preferences at http://www.icq.com/support/security/index.html
If your internet provider or system administrator are using a proxy server or
have a firewall set up your ICQphone may not work. You can check your connection
by doing the following:
- Click Services.
- Select ICQphone.
- Choose Preferences.
- Click on the Settings tab.
- Click on the Setup Wizard button.
- Click Next until you get to Network and firewall testing dialog.
In certain cases, if you are behind a firewall in a LAN or Intranet Network, and
you are not able to communicate with users outside your firewall, you may still
be able to use ICQphone inside your Network.
ICQphone can be used between parties on the same private network. However, you
cannot call into or out of the private network with ICQphone.
ICQ SMS (Short Messaging Service)
The SMS (Short Messages Service), is a technology used in cellular phones to
send text messages to and from cellular phones. The ICQ SMS feature integrates
the ICQ program with SMS technology and is currently available with selected
cellular phone technologies.
Click here for a list of
supported SMS Networks.
With the ICQ SMS feature you can do the following:
Sending an SMS Message from
ICQ to a Cellular Phone
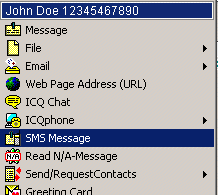
To send an SMS message:
- Click on a user name or a Non ICQ Contact name on your Contact List.
- Select SMS Message .
If you have previously entered a number in the User's Details, the number
will automatically be entered. You can change the destination by clicking on
the To button.
Note: An SMS icon will appear next to the name of the user on your
Contact List whose details are entered.
If no number was entered in the User's Details, a dialog will appear
providing you with the option to enter his/her details.
- Enter your message with up to 160 characters in the Message Text
field.
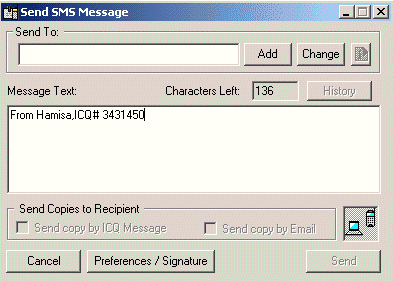
- Click the Send button.
After you send your message you will receive a confirmation or a failure
message notifying you that the SMS message could not be sent. This message
only confirms receipt of the SMS message by the carrier.
Note:You can also send SMS messages by clicking Services, the SMS icon
and entering the country (from a drop-down list) and the phone number of the
recipient.
Receiving SMS Messages to
my ICQ program
You can receive SMS messages in reply to an SMS message that you have sent from
your ICQ, or an SMS initiated by a cellular phone to your ICQ. You can receive
an SMS message from users on your Contact List, Non ICQ Contacts or from unknown
users.
To receive an incoming SMS message:
- Click on the Incoming SMS Message flashing icon beside the user
name.
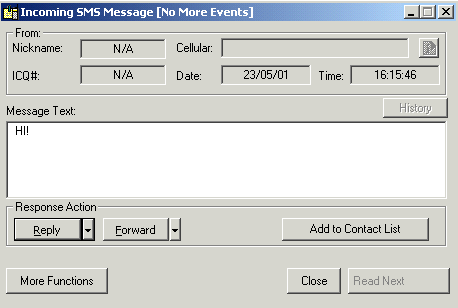
Remember the SMS icon will appear next to the user's name only if the user
is on your Contact List and if his/her user's phone details were entered in
the User Details.
SMS messages from a user who is not on your Contact List or whose mobile
phone numbers are not entered will blink in your System Notice
button.
- Choose Reply, Forward or Add to Contact List.

Adding Your ICQ
Contacts to Your Mobile Phone
Add your ICQ Contact List to your mobile phone's address book and message your
ICQ pals. It's easy! You will be able to send an SMS message only if your mobile
phone is subscribed to a GSM provider and is SMS-enabled by the provider.
- Save the your friend's ICQ # with the fixed prefix "+2783142"
in your mobile phone's address book in this format: +2783142YourFriend'sICQ#.
For example: If the recipient's ICQ number is 2444092 the number you need to
enter is +27831422444092.
- Initiate a new SMS message and select the ICQ user from your phone's
address book.
- Write your message and click Send.
Your friend will get your message to his/her ICQ and will be able to reply
back to your cellular phone.
Adding Mobile Numbers
To enter an SMS number for an ICQ friend on your Contact List:
- Click on a user name on your Contact List (or Non ICQ Contact). Select User
Details/Address Book > Phone Book.
- Click on the Add button to add a new number. Enter the relevant
details in the Add/Edit Phone and Fax Numbers dialog. Remember to
check the SMS Service Available box.
- Click on the OK button. An SMS icon will appear beside the user's
name on your Contact List.
Note: Phone numbers that you enter in the User Details for an ICQ
friend on your Contact List are not visible to other ICQ users.
Other useful SMS options:
 | View your SMS Messages in the ICQ History of Events
 | Send a copy of your SMS Message by email or ICQ |
|
More ways to send SMS with ICQ
- SMS via Web - Send & Receive SMS messages form your personal
SMS inbox on the ICQ Web site
- SMS via Email - Send SMS from any email to your friend's cell
phones
ICQ offers you a free Web based Email account.
All you have to do is sign up and you will have your free email account.
• Signing up for free ICQmail account
• Checking your ICQmail accounts
• Receiving ICQmail to your ICQ Contact
List
• Sending ICQmail
• Configuring your ICQmail preferences
Signing Up for an ICQmail Account
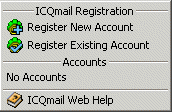 You may sign up for one or more ICQmail accounts. You may do so from the ICQ
program, or from the ICQmail
Web site. To sign up for an ICQmail account:
- Click on the Services button.
- Select ICQmail on the menu that appears.
- Select Register New Account. You will be led to the registration
Web page.
- Follow the step-by-step instructions. Once you have completed the
registration process, you will receive a welcome mail. If you are online, a
flashing ICQmail
 icon will appear on your Contact List.
- Double-click the flashing ICQmail
 icon. An Incoming ICQmail dialog appears with the various ICQmail options.
You will now be able to access your ICQmail account directly
from the Web site or from the ICQmail button in your ICQ program.
Mail from non-ICQ users will appear in your inbox on the Web. You will receive a
flashing ICQmail  icon next to the name of ICQ users or non-ICQ users if you have configured their
account settings in the Accounts tab of your Preferences.
Checking Your ICQmail Account(s) 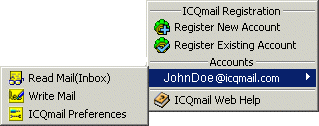
- Click on the Services button.
- Select ICQmail on the menu that appears.
- Select the account you wish to check.
- Choose the account that you want to check (you may have more than one
account). You are led to the ICQmail Web site. Alternatively, click on the
flashing ICQmail icon on your Contact List or next to the sender's name.
- Select Read Mail (inbox).
If you choose to access the account directly
from the Web site, enter your e-mail address and ICQ password in the
appropriate fields and then click on the Login button.
You may choose from the following options:
- Click on the Select All button if you want to move all e-mails
to the Trash, Sent or any other folder you may have created.
- Click on the Unselect All button if you do not want to move all
e-mails to the Trash or to the Send folder.
 | Place a check mark in the box next to the e-mail that you want to
choose.
 | Click on the Move To button and select the location to
which you want to move the selected e-mails from the drop down menu.
 | Select the subject that you wish to read.
 | In the Message window, choose from the following options.
 | Click on the Reply button to reply to the sender.
 | Click on the Reply All button to reply to all senders.
 | Click on the Forward button to forward the e-mail to
another address.
 | Click on the Move To button and choose the location to
which you want to move the selected e-mails from the drop down menu. |
| | | | | | |
Receiving ICQmail to your
Contact List
Note: You will receive a flashing ICQmail  icon next to the name of ICQ users or non-ICQ users if you have configured their
account settings in the Email Alerts of your Preferences.
- Double-click on the flashing ICQmail
 icon next to the sender's name. An Incoming ICQmail dialog appears.
- Choose from the following options:
 | Click on the pull-down down menu and select a name on the Contact List
to whom you want to assign the incoming account.
Click on the Assign button. The next time you receive an e-mail
from that contact, the flashing icon will appear next to the contact's
name on your Contact List.
Note: This option will be available if the sender is an ICQ user
who appears on your Contact List.
 | Click on the Search user in Email directories button to find
more information on the sender or add him/her to your Contact List.
 | Click on the Invite user to join ICQ button to send an
invitation to the user to join ICQ.
 | Check the Auto launch when new Email arrives to automatically
launch the browser upon receipt of an incoming email.
 | Click on the Publish Email button to publish the email account
in directories.
 | Check the Add This Account to Email button to activate the
email check whenever you receive an email from this particular user.
 | Click on the Read this mail button to read the whole content of
the email. |
| | | | | |
Sending ICQmail
- Click on the Services button.
- Select ICQmail on the menu that appears.
- Select the mail account from which you want to send the e-mail. You will
be led to your account on the Web site.
- Select Write mail.
- Fill in the information in the appropriate fields.
- Type in the e-mail in the blank field.
- Click on the Attachments button if you wish to send an attachment with
your e-mail.
 | Click on the Addresses button if you wish to open up your address book
and select the address of the recipient from the list. When you click on
a specific recipient, his or her address will automatically appear in
the To field of your e-mail.
 | Click on the Spell Check button to enable the spelling option to check
your document.
 | Click on the Send button to send your e-mail, or click on the Cancel
button to reset the form. |
| |
Configuring your ICQmail
preferences
- Click on the Services button.
- Select ICQmail on the menu that appears.
- Select the mail account you wish to configure.
- Select Email Preferences.
- Choose the account that you wish to reconfigure. You will be led to the
ICQmail Web site.
- You have the following options:
 | Click on the Forward option to configure your e-mail to forward
incoming mail to another account.
 | Click on the Vacation option to configure your e-mail to
automatically answer incoming mail with a standard message. This may be
useful when you are away and want to inform others about it.
 | Click on the External Mail option to configure your e-mail to
consolidate your ICQ e-mail with the other e-mails accounts. All e-mails
will then be received in the ICQ e-mail account.
 | Click on the Settings option to configure settings for the
appearance and operation of your e-mail account.
 | Click on the Personalities & Signatures option to create
different signatures for different people, or change the e-mail address
as viewed by other people.
 | Click on the Colors option to customize the mail's appearance.
|
| | | | |
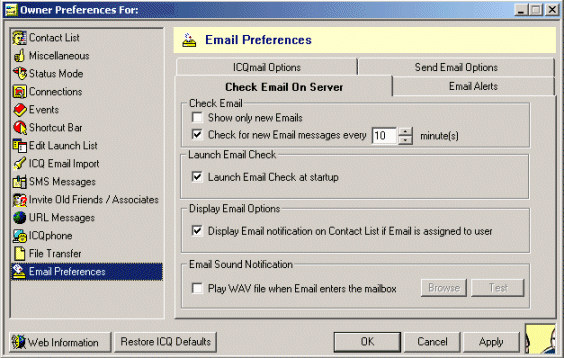
To access your incoming ICQmail alert preferences:
- Click on the ICQ button and select Preferences.
- Select Email references and choose the ICQmail Message tab.
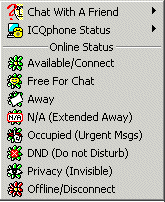
The ICQ Status Options
 |
Chat With a Friend -
See the ICQ Chat
With a Friend tutorial.
|
 |
 |
ICQphone Status - Let
your friends know you are available for PC to PC calls..
|
 |
Available/Connect -
Also known as Online.
|
 |
Free For Chat - See
the complete ICQ
Chat Tour.
|
 |
Away - Change your
status to Away. You may select between 8 different preset Away messages.
|
 |
N/A (Extended
Away) - Extended Away. After an extended period of being away, ICQ
will automatically set to N/A. You may also select between up to 8
preset messages for this status.
|
 |
Occupied
(Urgent Msgs) - If you don't want to be distracted for any reason,
use this status. Users will still be able to send you urgent messages,
or leave a message on your Contact List (the message icon will not
blink).
|
 |
DND (Do Not
Disturb) - If you are sent an event, you will be notified by a
non-blinking icon in your desktop tray and on your contact list. The
sender will receive a message that you do not wish to be disturbed.
|
 |
Privacy
(Invisible) - Choose this status to indicate to other users that you
are offline, when in fact you are online. You will be informed of the
online/offline status of your contacts however, you will seem offline to
them. If you decide to send an event to an online user while you are in
the Invisible mode, the recipient will see you on his online list with a
Privacy icon next to your name. This user will therefore be aware of
your online/invisible status.
You will also be able to receive events from those users whether you
appear to them online or offline (which will be announced by an alert
sound and a flashing icon on your Contact List and in your desktop
tray). You can override this status for selected users on your Contact
List by placing them in your Visible List.
|
 |
Offline/Disconnect
- Disconnect from the ICQ servers. |
The System Notice
Clicking on the System Notice will open the following options: 
 | History and OutBox - ICQ automatically logs
all incoming and outgoing system notice events sent from the ICQ server.
 | Incoming Files Folder - The files that you
have received from a user are stored in a folder matching that user's name,
in the Incoming Files Folder.
 | Incoming Bookmarks - The Incoming URLs
that you have saved as bookmarks are stored in your Incoming Bookmarks.
Note: Checking the box next to Do Not Log Event History stops logging
of all events. |
| |
To view the system history of events:
- Choose from one of the following ways to open the History Of Events:
The ICQ Server dialog.
 | Click on the System Notice button in the ICQ Window and select
History & OutBox.
 | Double-click on the System Notice button.
 | Click on the My ICQ button and select History. Then select
History & OutBox. |
| |
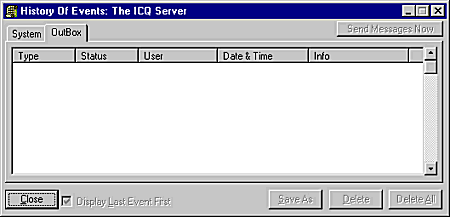
Choose from the following tabs:
 | Choose the System tab to display a list of events received from
the ICQ server.
 | Choose the OutBox tab, to show the events that you sent while
you were offline or to users who were offline at the time you sent the
events. Events are stored in the OutBox until you connect to an ICQ
server and if necessary, until the recipient goes online. |
|
Double-click on a message to get a dialog to display the contents of that
message.
Choose from the following options.
 | Click on the Close button to close the dialog.
 | Click on the Previous button to show the previous message on the list.
 | Click on the Next button to view the next message on the list. |
| |
Right-click on a System Message for options regarding the selected
message.
To view the files received by users:
- Click on the System Notice button in your ICQ Window, and select
Incoming Files Folder.
Alternatively, click on the My ICQ button and select Incoming Files
Folder.
- Double-click on the folder that you wish to open.
To view incoming bookmarks:
The Incoming URLs that you have saved as bookmarks are stored in your Incoming
Bookmarks. This option opens up your browser and allows you to view all of your
incoming URLs.
Note: ICQ is compatible with various Web browsers. ICQ saves your Web
page address in a file called Bookmarks.html under C:\Program Files\icq.Bookmark.
If you have neither Netscape Navigator™ nor MS Internet Explorer™, open this
URL in your browser and add it to your bookmarks. See Web Page Address
(URL)-Receiving.
If you do have MS Internet Explorer™, the URL will also be added under C:\Program
Files\icq.Bookmark\Bookmarks.html.
To view your incoming bookmarks:
- Click on the System Notice button and select Incoming Bookmarks.
Alternatively, click on the My ICQ button and select History and then
select Incoming Bookmarks. Your browser will appear.
- Choose from the following options:
 | If your Web browser is Internet Explorer you may select a URL you
received and automatically launch your browser to view the site.
 | If your browser is Netscape or other, click on the sender's name on
your Contact List and select History. Then select View Messages History
and choose the Incoming tab and select the URL you wish to view. |
|
The ICQ Web Search
 The
ICQ Web Search makes searching the Web quick and easy.
The Web Search is located at the bottom of the ICQ Window providing a gateway to
the Web. Just enter a search query and press Go and you are led to the
search results on the ICQ Search engine.
Even when your ICQ Window is minimized you may use the ICQ Web Search floating
panel to search the Web from your desktop, as you work on other applications.
To download ICQ click
here
Click here to return to main menu
![]()


 When using the Simple Mode, you can choose to be in Online, Offline or
Away status modes. That is, either connect to the ICQ servers, disconnect from
them or project to others that you are away from your computer.
 From now on you can access your contact List from any computer or wireless
device, Anywhere in the world.
From now on you can access your contact List from any computer or wireless
device, Anywhere in the world.![]() Use these two buttons above the Contact List to manage your list according to
your needs:
Use these two buttons above the Contact List to manage your list according to
your needs:![]() The Status button determines if all your contacts (both online and
offline) are displayed or only the ones that are online.
The Status button determines if all your contacts (both online and
offline) are displayed or only the ones that are online.![]() The Groups button lets you to divide your Contact List into groups to
more easily manage your list.
The Groups button lets you to divide your Contact List into groups to
more easily manage your list.


 You may sign up for one or more ICQmail accounts. You may do so from the ICQ
program, or from the ICQmail
Web site. To sign up for an ICQmail account:


